In the appropriate menu, click Risk Assessment/JHA (“Environmental Aspects” in the Environmental menu). All jobs whose Assessment Types match the suite you started from are listed.
Click New to create a new assessment, or click a link to view an assessment.
There can only be one active assessment per job per module.
If you want to create a different version of the job’s assessment information but retain the original, choose Actions»Clone and Inactivate. The original assessment is marked Inactive, and the job information, assessment reason, linked findings and actions, and information in the Tasks-Hazards-Controls section are copied into a new active assessment record. If the Parent field is selected on the original assessment, on the cloned record it will display the Job value from the initial risk assessment record, followed by the Risk Assessment ID in parentheses.
If you want to copy the current assessment to a different job, choose Actions»Copy and Create New Risk Assessment. You are prompted to select the job the copied assessment information should be linked to. The job information, assessment reason, and information in the Tasks-Hazards-Controls section is copied into a new active assessment record for that job. Any linked findings and actions are not copied over. If the selected job does not have any associated Risk Assessment Date, the Risk Assessment ID for the new record will be 1. If the job had an existing risk assessment record (and Risk Assessment Date), the Risk Assessment ID for the new assessment record will be the next number in the sequence for that job/task.
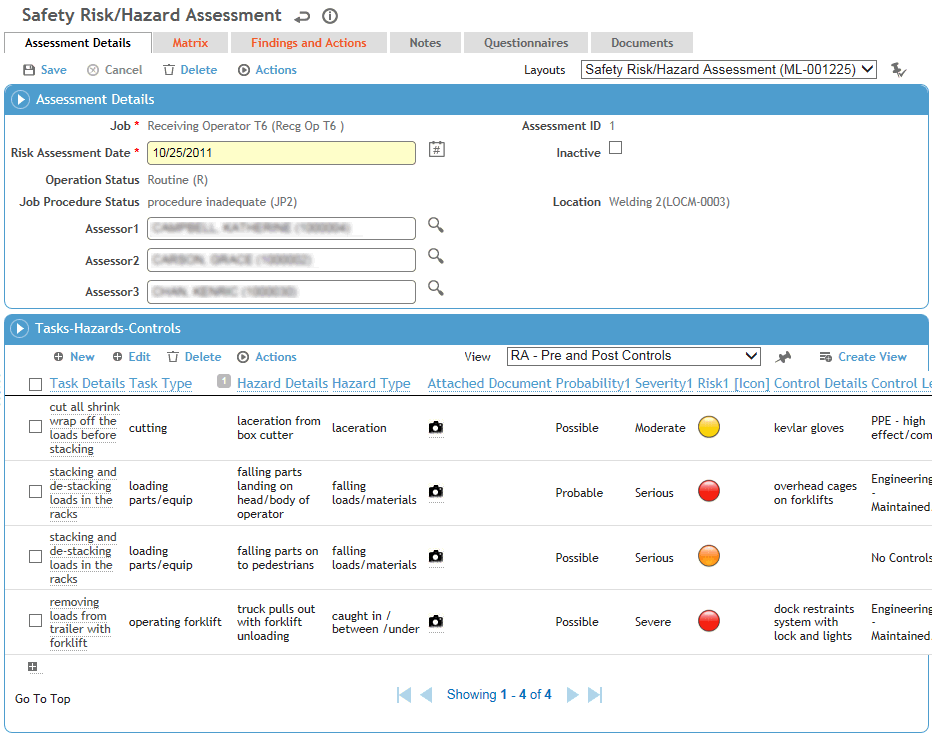
On the Assessment Details tab, in the section at the top, identify all persons involved in this assessment.
In the Tasks-Hazards-Controls section of the Assessment Details tab, capture the tasks as well as the potential hazards and recommended controls.
If a Safety Data Sheet is associated to an agent or product (in the AgentHazard look-up table), you will see an SDS link to the left of the task. Click the link to open the SDS in a separate browser window. An SDS can be added to an agent or a product; if no SDS is linked to the selected agent, the link will open the SDS for the product instead.
Streamline your data entry by setting up relational tables and system settings that filter available options based on your selections. For example: assessment category > agent group >agent > special notation. Similarly, the risk factor qualifiers available for each probability and severity depend on the assessment category chosen. Contact your Cority representative for assistance in setting up these relationships.
Create a separate record for each hazard.
-
To copy a risk assessment record, select the record and choose Actions»Copy Process/Task. A new record is created with the same data; open the link to record any new or different information.
-
A hazard record may be created automatically if a choice in a related questionnaire is identified as a risk factor. Contact your Cority representative for assistance setting up this custom functionality.
-
You can import tasks-hazard-controls records using the Import Utility (see Importing Text or XML Files into Cority Tables).
-
If multiple records have the same Agent, Process, and Task Type, select them and choose Actions»Merge Risk Records. The records will be merged into the record with the lowest Reference ID, preserving all data in that record but merging the Task Details and Hazard Details from each merged record.
If added to a custom layout, you can choose Actions»View Chemical Inventory to view any chemical products that have a current inventory value and that match the GDDLOFB criteria selected on the risk assessment record. If you select one or more products, the corresponding record(s) will display in the Tasks-Hazards-Controls section of the risk assessment record.
To add a task, click New.
-
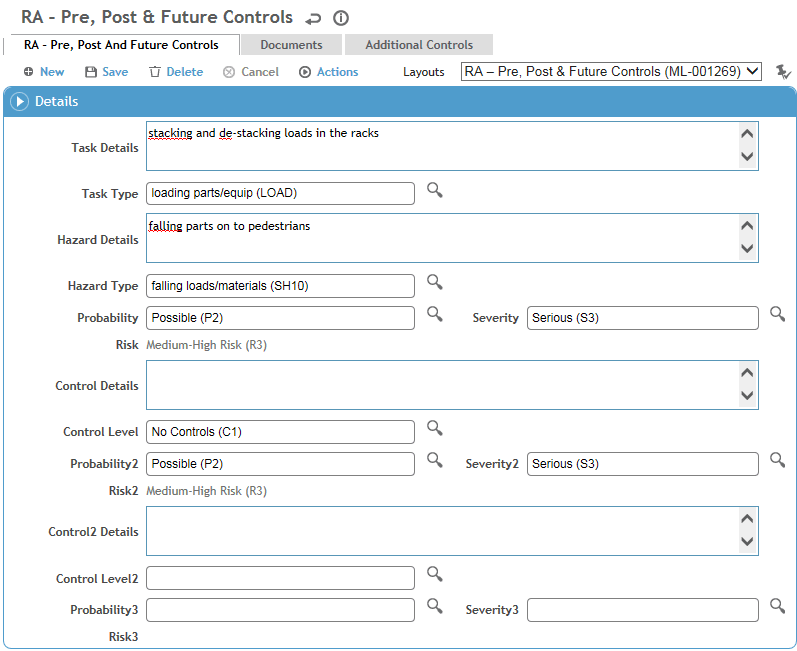
For a new record, enter the Task Details and select the Task Type.
-
Enter the Hazard Details and select the Hazard Type. Select the Probability of the hazard occurring and the potential Severity of resulting injury or illness. For Ergonomic assessments, select the Duration and Frequency.
-
Enter the Control Details and select the Control Level. Select the Probability and Severity of the hazard when using the control.
-
If you are using the Pre, Post and Future Controls view, you can enter a second control in the fields on this form. If necessary, use the Additional Controls tab.
You can add a product hazard to a risk assessment and all of its agents will be added automatically. You must add the Product column to the view and add the Product field to the Task-Hazard-Control form layout (see Changing What is Shown on a List or Form). When you select a value in the Product field (from the AgentHazard look-up table) and save the record, a record is created for each agent associated with the product.
The Risk is calculated based on the Probability and Severity identified for each stage (based on the hazard alone, with use of the first control, and with use of the second control). The calculation formula is set by the administrator in the Risk Settings (see Working with Risk Settings).
To print a Job Hazard Analysis Report, choose Actions»Generate JHA on the Assessment Details tab. To just print the assessment form (without the buttons and tabs showing), choose Actions»Print Assessment - the RiskAssessmentId must be populated on the record. The risk matrix will print in color (but will not include the task details shown on the enhanced matrix).
-
Click Save to return to the Risk Assessment form.
The Matrix tab provides a visual representation of the risk levels over time. See Working with Risk Assessment Results.
The Findings and Actions tab provides views for all findings and actions linked to a job, risk assessment, and/or job hazard that are recommended (or required) to protect workers from hazards, such as choosing appropriate protective equipment, and ensuring that workers receive the equipment needed.
-
For information about recording a finding and its actions, see Recording a New Finding.
-
To view an action’s attachment, open the finding and choose Actions»Open Document.
On the Notes tab, enter any notes about the assessment. For more information, see Adding Notes to a Form.
The Forms tab displays all forms in the PDFForm look-up table that have been linked to the risk assessment module. Open and complete these as required.
The Questionnaires tab displays all questionnaires associated with any of this job’s assessments (active and inactive, from all applicable suites) and allows you to associate questionnaires with a record. For information about creating and administering questionnaires, see Questionnaires.
The Documents tab displays all documents associated with any of this job’s assessments (active and inactive, from all applicable suites) and allows you to link external files containing background or supporting information to an assessment record for easy access to the file. For more information, see Linking or Importing a Document.